Showing posts with label LED. Show all posts

Monday, January 16, 2017

Update for the Start of 2017

Sorry for the long hiatus ...

Getting to the Finals of the Hackaday Prize and trying to get my project to a functional prototype really burned me out for a little while - I needed a little rest but I'm back now.

Have a look at the winning entries for the Hackaday Prize 2016 (they are really amazing).
I was hoping that I might be able to make it out to the Hackaday Conference (I even submitted a proposal for a talk). Well, I didn't make the cut.  But here are links to the amazing talks at the conference:

Not that I've ever stopped making stuff, just that I took a break from working on my Universal Glucose Meter, etc... and worked on some other areas for a bit.

Here's some stuff I've been busy with since November 2016:
  • Cheapo SphereBot (from salvaged parts)

  • Portable Oscilloscope Build (from kit, mostly) 
  • Reflow Oven (ControLeo 2, some very minor additions from me)
  • 2 Watt LED (445nm) Laser for 3D Printer, CNC (kit build, and review)
  • Sous Vide Build 
I'll link each of these to individual project pages with build information ASAP.

Sunday, June 19, 2016

Project Universal Glucomter - 1st Contact

I posted the basic details of this on Hackaday earlier, thought I's post the some of the nitty gritty details here.

I decided to take a step back and return to some real basic level stuff for programming and using PIC Microcontroller's. First order of business was to ensure my programmer (PICkit3 clone) actually works and that I can actually upload programs (I know compiling programs works but I haven't actually uploaded anything) .  Back when I ordered my last LCD screen (which is actually the wrong one for the reference design from Microchip) I also ordered a few PIC16F877A chips since I have some books that use them for learning to code in C for PIC's.

The first program I wanted to try was the most basic, a simple "Hello World" program that blinks an LED.  The tutorial I worked from was Blink LED with PIC16F877A.  The first hurdle I needed to make it over was how to actually connect the PICkit3 to the micro-controller (in hindsight, if I had started with a Development Board this would not have been an issue). Bread boarding the circuit was no problem from the schematic:


Blinking LED using PIC Microcontroller - Circuit Diagram

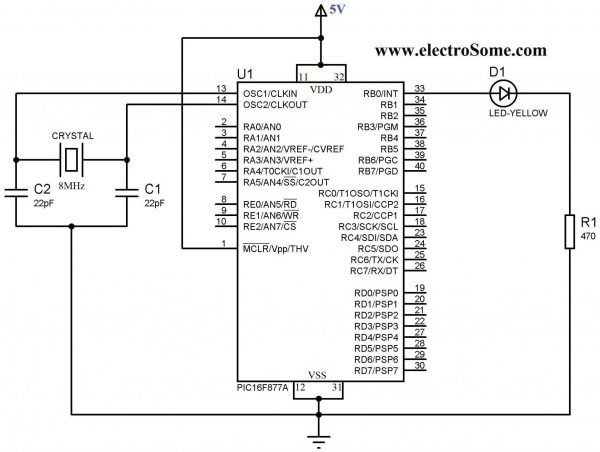
As I put together the circuit on a solderless bread board I realized that I did not order any crystals for the timer oscillator (I'd spent so much time going over the datasheet for the PIC16F1786, from the glucometer reference design, that I never realized that the 877A has no internal oscillator).  After going through crystals I scavenged from old electronics, I found a 4MHz ceramic (3 pin, no need for external capacitors) oscillator.  I didn't really know if it still worked after de-soldering it from devices and I'm not really sure how I could test it but took my chances and used it anyway.

After everything was assembled I needed to connect the PICkit3 programmer.  Pin #1 is designated on the connected by a solid white arrow.  Pin functions are:
1 = MCLR/VPP
2 = VDD Target (power)
3 = VSS (ground)
4 = PGD (ICSPDAT)
5 = PGC (ICSPCLK)
6 = PGM (LVP)

VDD and VSS could easily have confused me but I knew from prior reading that VDD is + power and VSS is ground.  That leaves the other 4 pins - actually 3 since pin 6 is not used here.  Referring to the pin out for the PIC16F877A chip:
The MCLR/Vpp pin is obviously pin 1 of the chip.  Looking at the diagram, you may think , as I did, that pins 25 and 26 are the Clock and Data pins.  As I found out - that is wrong, PGD (ICSPDAT) is the Data pin (pin 40) and PGC (ICSPCLK) is the Clock pin (pin 39).  In addition to this, there are a few other points to consider:
  • 100uF ceramic caps across pins 11/12 and 31/32
  • pullup resistor on MCLR/Vpp (pin 1) - around 5-10K
Before building the project you need to be certain that the Configuration Bits are set correctly and added into the start of the code.  I ended up having to change the oscillator setting to:
#pragma config FOSC = XT        // Oscillator Selection bits (XT oscillator)

My other Configuration Bit settings were:
#pragma config WDTE = OFF       // Watchdog Timer Enable bit (WDT disabled)
#pragma config PWRTE = OFF      // Power-up Timer Enable bit (PWRT disabled)
#pragma config BOREN = ON       // Brown-out Reset Enable bit (BOR enabled)
#pragma config LVP = OFF        // Low-Voltage (Single-Supply) In-Circuit Serial Programming Enable bit (RB3 is digital I/O, HV on MCLR must be used for programming)
#pragma config CPD = OFF        // Data EEPROM Memory Code Protection bit (Data EEPROM code protection off)
#pragma config WRT = OFF        // Flash Program Memory Write Enable bits (Write protection off; all program memory may be written to by EECON control)
#pragma config CP = OFF         // Flash Program Memory Code Protection bit (Code protection off)

It's taken me a few days of reading, trial, and error but I've finally gotten an LED to blink (pretty impressive right!).

Next step is attaching and sending text to a standard 16x2 LCD.

If I have to I will stick with the PIC16F877A, but if I do I'll at least need an external Op-Amp connected (to amplify the signal from the strip).  Hopefully I'll be able to return to the 16F1786 and won't need to deal with that.


Thursday, June 25, 2015

Project Edge Lit Sign - PART 2

The Electronics

This part of the project took me a bit longer than I expected.  I thought I had everything figured out for the design, parts and programming for the micro controller (Arduino Pro Micro) but ran into an unexpected issue that forced me to change course and use completely different hardware along with software libraries I hadn't used before.  Good news is that even with the changes and learning new hardware and software the new setup is actually easier and simpler to wire up and use.

My initial electronic design for controlling RGB LED's for the sign illumination.
Parts:
  • 5mm RGB Common Anode LED's 
  • TLC5940 shift registers 
  • Arduino (Nano on breadboard)
  • Resistors for setting current limit
I built up the circuit on a solder-less breadboard to get it working.  Below is the setup from the Arduino Playground.

Wiring for TLC5940
Pictures of the layout:

I transferred the circuit to perf board (laid out the same as solder-less breadboard), cut and drilled out a piece of wood to mount the LED's in my box and wired in a wall wort for power.

All the Parts
Perf Board (back side)
 
Wiring it all up
Software library, further instructions, etc can be found at:
  1. Direct link to Google Repository
  2. Arduino Playground page for TLC5940
 So, after all that work building and testing - it worked perfect but it just wasn't bright enough for the sign so I had to reboot and go a different route.

Decided to go with Neopixels - much brighter RGB LED's.  Individually addressable for color and brightness, much easier to wire up - just a 3 wire connection to Arduino (Trinket or clone).  Do need real basic power filter (1000uF 6.3v or higher electrolytic capacitor across power rail to filter out spikes) as well as current limit to data line (300 to 500 ohm resistor to keep current at set level).

Currently there are 2 very good libraries (that I know of) for controlling Neopixel's with an Arduino.  I provided links to them as well as guides to using them below.

FastLED
Adafruit Neopixel
I'll complete this post tomorrow (Part2b) with the final electronics and code.   

Wednesday, May 20, 2015

Project Edge Lit Sign - Trying Edge lit Sign Again, PART 1

Revisiting my Edge Lit Sign project.  I'm dividing this up into 3 segments due to the separate challenges that I encountered working through each part of this project.  This segment addresses just the engraving of the sign, other segments will address the electronics and mounting/housing.

Many, many people have made acrylic signs illuminated with LED's on the edge.  Adding illumination to the edge of the acrylic causes it to light up only in the areas that it has been cut or engraved. I've previously tried this using window glass engraved using diamond glass cutting bits – it didn't end up being very bright (turns out acrylic transmits light better than glass).

With my 3D Printer build last summer, I shelved this project until I had the time to come come back to it and that's what I'm finally doing.  Instead of etching glass, this time I'm trying it with acrylic that is custom made for edge lit signs (it is clear but has metal flakes embedded in the acrylic that reflect light when the acrylic is cut), you can find it over at Inventables.

I was inspired to do this sign project as a gift for my wife, she owns and runs a nut free bake shop (Callie's Cuties) and I wanted to make her a fun sign for inside her shop with her logo on it.  After getting a vector file of her logo, I opened it up in Inkscape (an open source vector editor).  I only changed a few parts of it to make it a little more friendly for engraving on my CNC (primarily different fonts).  When I finished my changes I selected the whole graphic and made certain to change it all to a Path (selected Object to Path in the Path drop down menu), then I flipped it to make it a mirror image and then rotated it on its side (to fit the dimensions of my CNC).

After working out the size and layout of the sign I made a cardboard mockup to better visualize what my goal was.
measuring and cutting out the cardboard

Reversed image to be engraved (should have used normal image)

Checking image against acrylic stock

Assembling the base

Finished base

Mockup Done!
After reviewing this with my wife, I needed to make a few changes - adding "Open" and "Bake Shop".  So, the orientation changed and the sign became 8" wide by 10" high instead of 9" wide and 8" wide.
 
On to my first hurdle, figuring out the feed rate and depth of cut took a bit of trial and error, I'm using a 1/16" single flute end mill by Kyocera (purchased from CarbidePlus).  Initially I thought I would need to cut fairly deep into the acrylic cut so my first try was cutting to 0.1" depth (almost 1/2 the thickness of the sheet) with a step down of 0.05" (so 2 passes to reach target depth).  First test at 30 in/min was much to fast, I lowered to 20 in/min - still to fast, and then to 10 in/min.  Now that I had a good speed I needed to adjust the cut depth for each pass, 0.1" was definitely to deep, it resulted in to much friction and the end mill getting clogged with melted acrylic.  In addition to that, I felt I was aiming much to deep for my target depth.  I decided on another trial at 8in/min, 0.01" target depth with step down of 0.005".  The first pass achieved the results I as looking for.

I changed the cutting parameters in MakerCAM, selecting the entire graphic and using the "follow path" on the CAM menu: tool size 0.0625", depth of cut 0.004", safe height 0.25", step down 0.004".  After saving the new G-Code file I placed a new piece of acrylic on the bed and ran the code through Universal G-Code Sender.  You can see my result below.

Milling the Reversed Image

The finished image (before cutting extra stock off)

I should note that in my impatience I wasted a sheet of custom acrylic but trying to cut first before determining optimum speeds and depth for my CNC.